ZFS Error on Datto Upgrade

As we continue upgrading our Datto fleet to 16.04, we’ve encountered some problems.  A new one this morning:

After reboot, the device was checking in, but the zfs filesystems weren’t mounted.  This happens occasionally, even during normal operation.  However, I wasn’t able to execute any zfs commands to fix it.  I received this, even with a basic one:


root@datto:~# zfs list
The /dev/zfs device is missing and must be created.
Try running 'udevadm trigger' as root to create it.

This is a misleading error message. As noted on this GitHub Issue, the issue is that /etc/mtab is missing. Recreate with


root@datto:~# touch /etc/mtab

Then reboot.

Datto Upgrade Error

In upgrading devices to Ubuntu 16.04, I’ve encountered a problem with / more than once now. Specifically, it’s coming up read only:


root@datto:~# checkin
Checking to see if checkin is currently running
/datto/scripts/DoBackup.sh: line 92: /datto/config/checkin.lock: Read-only file system
flock: 200: Bad file descriptor
Checkin is currently running. Exiting...

The checkin script uses a lock file as a semaphore to ensure that only one copy of the script executes at once. Even though there aren’t any other instances running, the checkin script fails because it can’t create the semaphore, with the self-explanatory error of “read-only file system”.

The output from mount verifies this:

/dev/md1 on / type ext4 (ro,relatime,data=ordered)

As the error indicates, root is mounted read-only. Obviously not the ideal situation.

The first, obvious, step is to simply make / read/write:


root@datto:~# mount -o remount,rw /
mount: can't find UUID=eaf3a162-d770-4ec9-a819-ec96d429ea9f

The device name of /dev/md1 indicates that this is a software RAID volume. What seems to happen during these upgrades is that the UUID changes, meaning that the entry for / in fstab is wrong. To fix this, first get / mounted read-write:


root@datto:~# mount -o remount,rw /dev/md1 /
root@datto:~#

Checkin will work now. If you can get the device to checkin again, this is a good time to call support to verify that there are no other issues from the upgrade.

To be clear, that’s my recommendation: Call support once you get the deice to checking in again. Most partners shouldn’t be messing around with the appliances like the below.

Note that the web won’t work yet. To bring that up, issue

root@datto:~# /etc/init.d/php7.0-fpm restart
root@datto:~# /etc/init.d/apache2 restart

You’ll also find other problems on the device (the zfs pools are unmounted). While you can fix these manually, your efforts will go to waste once the device reboots. To fix this permanently, you need to fix the UUID for / in fstab.

Make a backup copy of fstab first:

root@datto:~# cp /etc/fstab /etc/fstab.bak

Then, identify the correct UUID for /dev/md1

root@datto:~# blkid /dev/md1
/dev/md1: UUID="13152fae-d25a-4d78-b318-74397eb08184" TYPE="ext4"

Then, edit fstab and change the line for md1 to use the new, correct UUID.

Next, ensure that there is a valid mtab file to use:

root@datto:~# touch /etc/mtab

Creating Scan Folders With PowerShell

In the process of moving file servers around, I wanted to clean up a share that’s full of scan destinations for individual users.  There were a number of problems with the original setup:

  • Not everyone had a folder to begin with.
  • The names might or might not match the person’s user name in Active Directory.
  • Everyone had access to every scan folder.

Obviously, a bad situation.  While this client isn’t enormous, it’s large enough that I sure didn’t want to do all of this by hand.  Creating the folders is trivial with a script, but I wasn’t sure how to do the permissions, so decided that this was a good time to find out.

I created the scan folder, turned off inheritance and set the default permissions on the folder, specifically this installation needed the following:

  • Domain Admins: Full Control
  • SYSTEM: Full Control
  • CREATOR OWNER: Full Control [Note:  I realize not everyone does this, but I do and that’s not what this post is about]
  • Scan User: Modify
  • User: Modify

The actual user doesn’t have permissions to the root scan folder, but can access it via the direct path.  In other words:  \\Server\Scans is an access denied error but \\Server\Scans\JSmith works.

Here are the first few lines of the script, the part I already knew how to do.  At this particular client, all of the users who have scan profiles are located in a single OU, so the first thing I did was pull all of those users into an array:

Import-Module ActiveDirectory

# The root folder 
$ScanRoot = "D:\Shares\Scans"

# The OU these users are located in:
$OU = "OU=Scan Users,OU=Corp,DC=Contoso,DC=com"

# Get all of the users in the OU
$users = Get-ADUser -Filter * -SearchBase $OU | Select-Object Name, samAccountName

Next, I needed to iterate through each user and check if a folder needs to be created for that user.  If so, create it.  Again, there’s not much to this part. [NOTE: I’m assuming here that the creation succeeds for the sake of code clarity here]


# Iterate through each user and create a folder, if necessary
ForEach ($user in $users)
{
# The full path to the folder
$FolderPath = "$ScanRoot\$($user.SamAccountName)"

# Check if the folder exists
$Exists = Test-Path $FolderPath

if( $Exists -eq $False )
{
Write-Host "Folder $FolderPath does not exist, creating".
New-Item $FolderPath -ItemType Directory
}

When creating this folder, the permissions from its parent came up by default because inheritance is on for the sub-folders.  I needed to accomplish two things:

  • Clear any ACEs that were applied to just that folder
  • Add Modify permissions for that specific user

The first attempt at this used a cmdlet called Get-ACL, which made sense.  However, I ran into problem after problem using this (apparently because it tries to change ownership when applying changes among other things) and switched to a different method.  This is somewhat non-intuitive as there doesn’t seem to be a good way to create an ACL out of nothing.  You need to grab it off of the file/folder and modify it.


$ACL = (Get-Item $FolderPath).GetAccessControl('Access')

To clear the items, I used the following:


$ACL.Access | %{$acl.RemoveAccessRule($_)} | Out-Null

RemoveAccessRule needs to take an ACE as its only parameter.  That actually seemed a little wonky at first, but it makes sense that you couldn’t just say: Remove all ACEs with Administrator in them.  Well, I suppose you could, but there’s not a function for that.  I pulled the list of all of the ACE’s and removed them. The Out-Null just suppresses command output for cosmetic reasons, no actual function.

With a blank ACL, the next step was to add the permission for the individual user.  This took some browsing around TechNet and some time on Microsoft’s forums as well, but I eventually worked out the following:


# Add the user
$ACE = New-Object  System.Security.AccessControl.FileSystemAccessRule("$($user.samAccountName)","Modify","ContainerInherit,ObjectInherit","None","Allow")
$ACL.SetAccessRule($ACE)

The line that creates the ACE doesn’t make a lot of sense without explaining the parameters, so let’s do that.  I’m using this constructor

  • $($user.samAccountName): This is simply the username from the AD user object at the top of this script
  • Modify: This is the permission level that the user needs to have.  A full list is available on TechNet
  • ContainerInherit,ObjectInherit:  These are flags that set the “This folder, sub-folders and files” option that you see in the Advanced security settings window.  Getting this wrong would cause the ACE to only show up in Advanced
  • None: This is specifying that the permissions do not need to be applied to sub-folders.
  • Allow: This is simple:  Allow or Deny

Once you have the ACE created, add it to the ACL that was pulled from the folder with the SetAccessRule call.  I’ve tested the None option against the other possibilities for propagation.  This behaves as I expect it to.  If another user (either a Domain Admin or the Scan user) creates a file, the primary user will have modify rights to it, but not full control.  This is what I want.

Note that this only adds it in memory, so the last step is to apply that ACL to the folder:


Set-Acl $FolderPath $ACL

Putting it together:

Import-Module ActiveDirectory

# The root folder 
$ScanRoot = "D:\Shares\Scans"

# The OU these users are located in:
$OU = "OU=Scan Users,OU=Corp,DC=Contoso,DC=com"

# Get all of the users in the OU
$users = Get-ADUser -Filter * -SearchBase $OU | Select-Object Name, samAccountName

# Iterate through each user and create a folder, if necessary
ForEach ($user in $users)
{
    # The full path to the folder
    $FolderPath = "$ScanRoot\$($user.SamAccountName)"

    # Check if the folder exists
    $Exists = Test-Path $FolderPath

    if( $Exists -eq $False )
    {
        Write-Host "Folder $FolderPath does not exist, creating".
        New-Item $FolderPath -ItemType Directory
    }

    $ACL = (Get-Item $FolderPath).GetAccessControl('Access')
    $ACL.Access | %{$acl.RemoveAccessRule($_)} | Out-Null

    # Add the user
    $ACE = New-Object  System.Security.AccessControl.FileSystemAccessRule("$($user.samAccountName)","Modify","ContainerInherit,ObjectInherit","None","Allow")
    $ACL.SetAccessRule($ACE)

    Set-Acl $FolderPath $ACL
}

Comments/corrections welcome.

Datto Upgrade Failed From Pending Restores

I’ve been going through the process to upgrade our Datto fleet to 12.04 recently.  The process is straightforward, though we’ve hit some bumps in the road.  One particular issue has come up several times in the web UI during the restore process:

datto_upgrade_errorThe text of that error is:

“Active restore(s) detected.  Please clean up before continuing.”

Checking the restore tab, you’d see that there aren’t any active restores in the web UI, so there isn’t anything to clean up:

no_restoresIf you see this, it means that a restore didn’t dismount properly, even though it’s not present in the web UI anymore.  To check, connect to the console (either via SSH or VNC), su to root and execute the following:

zfs mount

This will show you a list similar to the following.  [Note:  I’m sorry that this is so obfuscated]

mount_pointsAll of the lines that start with homePool/home/agents/ and show the mount point as somewhere under /home/agents are normal.  Those are the mount points for individual agents and would exist under any circumstances.

The last item, the one ending in -file is what causes the issue.  That’s a zfs clone created when you run a restore from the UI.  It may not always get removed correctly.

To fix this issue, destroy the clone with zfs destroy and the name of the clone.  Note:  This destroys the clone and not the actual snapshot (although that may get purged by retention later on).  As an example, consider that that agent’s IP was 192.168.1.5.  The command would be:


zfs destroy homePool/192.168.1.5-1429826219-file

One completed, zfs mount should just show the agents and your upgrade will proceed normally.

Unable to Login Locally

I received the following error message when trying to login to the console of a server this morning:

login_error

For future search engine purposes, here’s the text:

You cannot log on because the logon method you are using is not allowed on this computer.  Please see your network administrator for more information.

Aside from the usual frustration caused by this message (I am the network administrator), this server is a domain controller and I wondered if I would be able to logon at all.

Fortunately, remote desktop still worked correctly for logon.  Looking at the event logs, I saw the following for the failed login:

error_logLogon Type 2 is Interactive, or a console logon.  The error is indicating that this account somehow didn’t have permission to logon interactively to this computer.

There are a few places to look for this in Group Policy:  All of the policies that apply computer settings to this computer.  In this environment, the only two policies that applied to the machine were the defaults:  Default Domain Policy and Default Domain Controllers Policy.

In both cases, the items to look at are:

Computer Configuration->Policies->Windows Settings->Security Settings->Local Policies->User Rights Assignment->Allow Logon Locally

Computer Configuration->Policies->Windows Settings->Security Settings->Local Policies->User Rights Assignment->Deny Logon Locally

Here’s what those options looked like in Default Domain Policy:

default_domainThe options were actually configured in Default Domain Controllers policy:

allow_logon_locallydeny_logon_locallyBased on the groups listed in the Allowed section, Administrator should be able to logon locally.  I wasn’t sure whether Administrator was in any of those groups, but I checked its group memberships with the following:

group_membershipsNothing in there.  However, the net use command used in this way won’t show you nested groups.  To find those use dsquery piped to dsget (info on this is all over the web.  I certainly won’t claim to be the first person to come up with this idea):

dsquery user -name “Administrator” | dsget user -memberof -expand

Here are the results:

expanded_group_membersOne of the groups stood out here:  Remote Operators.  It looks suspiciously like SBS Remote Operators from the policy denying local logons.

In fact, here’s the property sheet for the Remote Operators group:

remote_operatorsThat explained it. Administrator was simply denied permission to logon based on a group membership leftover from SBS.  Since this network no longer has SBS, I opted to simply remove that group from the Deny Logon locally option and refresh group policy. After that I was able to logon to the console.

Removing Datto Backup Hold

Sometimes, when working on a Datto appliance, I’ll see a message like the following:

Datto Hold

The text of the message is “Warning! All backups and screenshots have been paused to allow for device maintenance or troubleshooting.  If you continue to see this message for more than two hours, please contact technical support.”

In the past, contacting technical support was the only way I knew to remove this message.  However, I recently determined what controls this and wanted to share it:  It’s controlled by the file /datto/config/inhibitAllCron

If you see that message, you can simply rm /datto/config/inhibitAllCron to enable backups.

I would not suggest doing this most of the time as it is normally set by support, and different from the pause in the web UI.  However, in this example, I knew that it was just leftover from a support case and the engineer forgot to remove the hold after the issue was resolved.  Rather than create a new case for this, I just re-enabled backups.

Default Profile Inside Install.wim

I’ve been working on our imaging process and one thing has always bothered me.  I use a modified version of this script from TheITBros that removes the Windows Media Player icon from the taskbar from users who login.

Normally, the way to implement this is to place it inside of the Startup folder in Administrator’s profile during audit mode and then sysprep with copyprofile.

However, the imaging system I’m working on is slightly different because we build images for multiple companies.  I have my autounattend inserted directly into the Windows ISO so that I can instruct the person building the image to “install a PC with this ISO and then customize from there, running sysprep when you’re done.”  That way, I know that the image being built is at least starting the right way.

There are several files that I want in all of the installs that happen this way and for the most part, I’m able to mount the WIM file, insert it, and commit the changes.

However, if I browse to C:\Users in the default install.wim, I see the following:

Users

I had a few thoughts here:

  1. When I’m logged in Administrator’s profile becomes the Default profile, so what will happen if I place the file in Default?
  2. Neither Default profile doesn’t actually have a Startup folder in the start menu (Administrator does)
  3. The script deletes itself after it runs.  Is that going to break copyprofile?

Obviously, this is going to require some testing.  To see what will happen, I’m going to forget about the script for a moment (remember the self-delete) and place a file called default.txt in the Startup folder for Default and a file called Administrator.txt for the profile called Administrator.  For Default, I created the Startup folder manually since it doesn’t exist in the default WIM.

Side Note:  UAC didn’t prompt me when copying to the Administrator profile, but did when copying to Default.  That’s a good topic for another post.

Next, I’ll commit the WIM and image a PC with it to see what happens.  In case you’re not familiar with dism, here’s the commit command (Note, dism needs to be run from an elevated cmd.exe):

dism /Unmount-Wim /Mountdir:D:\Mount /Commit

That trailing commit is a question on every certification exam ever.

Next, I’ll create an ISO from the unpacked Windows image with oscdimg.  I had to look this up.  As always, the TechNet page is fully detailed and so verbose that I wasn’t sure what to do.

Here’s the command to create the ISO:

oscdimg -n -m -bD:\matt\downloads\ISOs\Windows7x64\boot\etfsboot.com D:\matt\Downloads\ISOs\Windows7x64 d:\Win7.iso

Based on that TechNet article, I suspect there are other ways to do this, but this has worked correctly for me.

With the ISO created, I created a test VM and assigned the image to the DVD drive and let Windows install (thankfully, this requires no user input, so I went to get a drink during the process).  This is the really fun part of working with imaging – waiting for Windows to install 100 times over.  Usually, I can use VM snapshots to help with this kind of testing, but it does me no good for testing automated installs.

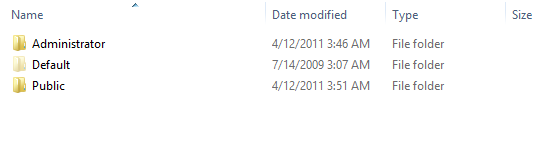
Once the image install finished, I found the following:

Post-Install

So this tells me two things:

  1. The folder named Administrator will be the default folder in Audit mode.
  2. Anything placed in Startup within the WIM will be run on first boot (this is before sysprep)
  3. If I put the vbscript in there, it would probably delete itself.

The reason I say probably here is because at this time, I’m not sure whether this is the default profile or a copy of it.  To find out, I checked out the Default folder in Windows Explorer:

DefaultProfile

What happened to default.txt remains a mystery – it’s completely gone.  Just to make sure that I wasn’t looking at an NTFS junction or similar, I saved some text to the copy of this in the Default folder and verified that it did not reflect in the other location.  It didn’t.

Now that I know where this file needs to be placed, the next step is figure out how to get it there without it executing and deleting itself.  The difficulty here is illustrated best in the help file that comes with WSIM about the copyprofile option:

CopyProfile runs during the specialize configuration pass and should be used after you make customizations to the built-in administrator profile.

The issue is that my script is going to disappear when it runs and so even though it will be in audit mode’s default profile, sysprep is going to replace that whole profile with (simplifying) the contents of C:\Users\Administrator which won’t have the script in it.

Let’s verify this.  I shutdown the imaging PC and remounted the WIM then replaced the text files I had earlier with the taskbar script (also removing the extra startup folder I created).  After committing this image, creating a new ISO and letting Windows setup run, here’s what we have:

emptystartup

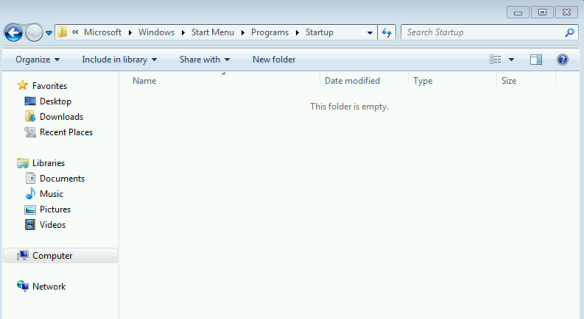
As expected, an empty startup folder.  Not shown in this screenshot is that the script did rearrange the taskbar as I had wanted it to.

Finally, back to the normal world of snaphots helping with testing.  I’m going to snapshot here before running sysprep as I test how to actually make this behave how I want it to.  As the help for the copyprofile option mentions, I have a separate XML file to pass to sysprep, separate from the one used to install Windows.  In the WIM I keep that in the sysprep folder so that someone following the process just has to run one command.  In this case, I’ll modify it on my host and replace it.

I think that the solution here is to put my vbs file right on C: and then move it to the default profile during the specialize phase, but I’m not sure if at that point in time I need to move it to Administrator’s profile or Default.  I copied the vbs to C: and added a move command the the xml file to copy it to Administrator’s profile during phase 4.  Here’s the result:

I used a very basic unattend.xml file with essentially only the move command in it.  This went through sysprep and came up with the following error:

error

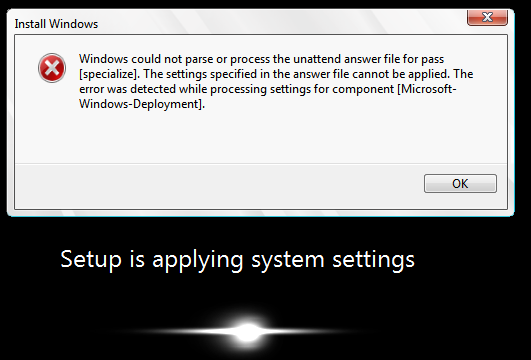
Given that this is the component and phase where I’m copying the file, it seemed obvious that that was causing the problem.  While this message was up, I opened a command prompt and checked the log file.  The following error was logged:

Hit an error (hr = 0x80070002) while running [md “C:\Users\Default\AppData\Roaming\Microsoft\Windows\Start Menu\Programs\Startup”]

0x80070002 is “no such file or directory”.  In the open command prompt window, I checked and to my surprise, the folder existed.  Clearly, I was losing my mind.

As an aside, the log file made it clear that the profile was copied before these commands are executed, which is something I was not sure about.

The first, and most obvious check was to double check the command I have in my answer file.  It was correct.  Then I noticed that the time stamp showed an older modification time than when the sysprep was running.  It actually looked like around the time Windows was installed initially on this VM.

If that’s the case, then md (mkdir) is blowing out because the directory already exists.  I don’t know of any switches to md that tell it to ignore a directory already existing, short of writing a batch file for this, so let’s just remove the directory creating line from the unattended file.

Same error, but on the move command.  I did a quick Internet search to see if anyone has seen this problem before and came across this thread.  That’s a good point.  Is move also a shell builtin?  I found lots of articles indicating that md was, but nothing for move.  However, a search for the executable turned up nothing, so I thought I’d give this a shot:

cmd /c move C:\SetTaskbar.vbs C:\users\Default\AppData\Roaming\Microsoft\Windows\Start Menu\Programs\Startup

That caused my unattend to run.  I had to go through Windows Welcome because there was basically nothing but the move command in the answer file.  Next, I checked to see if the vbs copied where I wanted it to.

Nope, nothing there.  Also, the SetTaskbar.vbs command is still sitting in C: Did this just not run at all?  I feel like I’m going through a lot of effort to make this work correctly. Taking a look at the log, cmd returned successfully, but it pretty much always will in this case.  Looking at my command above, there’s not a quote in there (Start Menu and the space). Let me add that and run sysprep again.

That worked!  The script ran in Administrator’s context when I logged on.  Next, let’s see if it actually did end up in the default profile by creating another user and logging on. That worked correctly, too.  I did have a prompt before it ran, but that was only because I had downloaded it from Dropbox on the web and there was an alternate data stream.

To recap, here’s what I was trying to do and what worked:

  • The taskbar script deletes itself when running, so I can’t put it in the default profile in the WIM
  • To work around the above, I decided to move it to the default profile from C: during sysprep
  • I need to move it into Default rather than Administrator because the move command will run after copyprofile
  • move is a shell builtin (as is mkdir) so I need to run the command with cmd.exe /c
  • The final command is cmd /c move C:\SetTaskbar.vbs “C:\users\Default\AppData\Roaming\Microsoft\Windows\Start Menu\Programs\Startup”

Vonage Support

I received a reply to a support inquiry to Vonage (about their Vonage Business product, previously called Vocalocity).  Very impressive:

Vonage

There’s not a ticket portal for me to log into and not a way to reply to this message.  Thankfully, the answer to my question was (sort-of) in the email reply, but still a rather poor showing.  Not that I expected much from a business aimed primarily at consumers, but come on!

Response to Datto Exploits From a User

EDIT:  Datto’s official response here: http://www.datto.com/sbsresponse

I don’t work for Datto, but I have a large enough fleet of devices that there’s probably a ‘Most Wanted’ poster in their office with my name on it.  I know a lot of people in the support department and there’s likely a collective “Oh no, him again!” when a new ticket comes in from my email address.

This morning, I saw a post come up on /r/netsec about  security issues on Datto appliances.  Reading this, I wanted to make a post about my take on these from an MSP’s perspective.  I’ll write my thoughts on each subsection of the post by Silent Break Security, available here: http://silentbreaksecurity.com/tearing-apart-a-datto/

Initial Access:

The VNC password is absolutely well documented, it’s known all over the place.  That being said, how are people getting access to the VNC server in the first place?  Unless you forward a port or put a public IP on one of these devices, nobody can get into them without already being connected to you internal network.

To be fair, this doesn’t apply to internal power users who might want to snoop, but for as long as I can remember there has been the option to change the VNC password.  To my knowledge, this will not impact support’s ability to work on the device, so this should be changed and documented for all of the devices in your fleet.  It’s rare that I need to VNC in anyway and it always means that something else isn’t working (usually because a client’s firewall is blocking remote web, and even then I’ll usually just use the web UI from a server).

backup-admin is the account that you need to use to SSH into the appliance as it can su to root via sudo.  Of course, this does require having a portal login to find out backup-admin’s password in the first place.  I will say that I’ve never seen a backup-admin password change, which wouldn’t be a bad idea.

aurorauser’s password is also pretty well known, but Datto isn’t as forthcoming about it as the VNC password.  I’m not really sure why this account exists, to be honest.  I always just assumed that it was so the console could be logged in already when an end customer connected a monitor.  I’d like to see this account disabled (depending on how that would impact other functions) and be presented with a login prompt (either a text based one or a graphical display manager) and do away with the automatic login of aurorauser.

Pulling out the root:

Nothing to say here.  Time to update your fleet, Datto users.

Building a backdoor

This is bad-ish IMO.  At this point you’re already root, so I’m not surprised that there’s a way to add users to the web UI.  I’m not sure it matters though as pretty much everything can be done with snapctl/speedsync and the normal Linux commands (especially related to zfs) anyway.

Finding the keys:

I’m combining this and the next section into one paragraph.  This is bad, but not as bad as it may seem. I didn’t know that snapctl had the addAgentPassphrase option.  The problem I have with it is that Datto’s marketing makes the point that nobody, not even Datto, can help you if you forget your password.  Here’s the thing, though.  This is all only going to work if the agent is already unlocked.  Meaning, after a reboot, *somebody* needed to know the correct passphrase before unlocking it, so presumably you need to have already unlocked the agent (it’s probably already unlocked to be fair), have root (not too hard if you’ve not upgraded to Ubuntu 12 yet) and that’s about it.  This is a risk for sure, but closing the aurorauser hole will fix it.

The obfuscated source is annoying, though and.  My first thought is ‘why bother’?  You’re likely not going to be able to see these without root and it doesn’t buy you much aside from needing to remember to run it through the obfuscater when making changes.

This doesn’t take into account the possibility of support adding one surreptitiously, but I don’t think it’s fair to expect Datto to be able to mitigate the possibility of a rogue support agent.

I don’t really consider sending commands to the agent and the other things you can do with snapctl to be a major security risk.  I know that these are used for troubleshooting.

Summary:

I think a lot of good can be done by the following:

  1.  Updating all appliances to Ubuntu 12 (and staying on top of patches as they are released)
  2. Changing the VNC password regularly, just like backup-admin
  3. Putting a login screen on the console, rather than automatically logging in aurorauser
  4. Clarifying what is and isn’t possible regarding encryption agents (the logging in after reboot is too much of a hassle for me to bother most of the time.  That’s not Datto’s fault, i just don’t want to do it)

Sage 50 P2V Woes

This weekend, I virtualized an existing physical server that happens to have Sage 50 Accounting 2014 installed.  I don’t have screenshots of this one because I didn’t start thinking it would be an interesting issue until the very last moment.

This went well, except that I noticed the Sage 50 SmartPosting 2014 was not started.  When trying to start it, I received the generic “Service has started and then stopped again” error message.

Wondering if this client even uses SmartPosting, I opened the sage icon on the server and saw the following message:

Error: “The activation key for Sage 50 is invalid or could not be read. Would you like to reactivate now?”

Thinking that this was just some issue related to the P2V and a license deactivating, I clicked Activate and nothing happened.

Oh boy.

There are a few articles on this on the Sage support sites, but surprisingly, “then nothing happens when you click Activate is not in them.  However, this article did point me in the direction of SageReg.exe.  I found this program in the same directory as the rest of the sage install.

Running it, I noticed that there is a tab for checking the activation status and a button to check.  I checked and Pervasive was in the state Failed Validation.  Some searching through Pervasive documentation indicates that this happens during hardware changes.  A P2V would definitely fit that description.  The bad news is that all of the documentation indicated that I should call Pervasive with my key to resolve this.

Because the version of Pervasive that comes with Peachtree is bundled, rather than a separate purchase, the key gets installed as part of the install.  An article on Sage’s website outlines the procedure for reinstalling Pervasive manually, rather than through the Peachtree installer (linked here), but the installer clearly states that this will not impact the license.

It doesn’t, so without any other valuable information in the documentation, I turned to Process Monitor to see what was happening when I clicked on the Activate button.

Here’s the screenshot (I applied a filter after the fact to make this obvious):

sage

The issue should hit you pretty quickly at this point.  When clicking activate, the installer is iterating through every directory in the current user’s PATH to try to find the SageReg program.  It can’t, which is why nothing happens when clicking the button.  I added the correct directory to the user’s path and ran through the process again.

Success!  The program went through its activation routine.  I can only assume that clicking that button passes some command line switches to the registration program that are required to work again.  Pervasive is also showing as licensed again in SageReg.

More importantly, the original two problems are resolved:  The SmartPosting service starts and the program opens as normal.