The Big Switch (Part 4)

I’m writing this from my Windows install on my SSD.  The conversion went very smoothly.  I rebooted, the Intel software copied my drive before even getting to Windows, and when I rebooted, my SSD was bootable.

With windows working, it’s time to get my Linux install squared away.  I’m going to recreate my raw vmdks, in case my drive numbers have changed in Windows.  I’ll pass both my RAID array and (about to be reformatted) Windows HDD.

The only difference this time is to make sure to dismount anything first if necessary (My old Windows disk got mounted at startup).

While booting, I kept receiving the following error:

vbox_error

The solution to this is to delete the partition on the disk before booting (I was about to format it in Virtualbox anyway).  After deleting that, my bridge VM worked correctly.  I went into /mnt and got my logical volumes mounted.

My HDD is sda (that’s because it’s attached to port 0 in the virtual machine settings).  So, the next step is to partition it the same way I had it partitioned under Windows.

In this case, I had the following partitions:

2MB – for GRUB2

200MB – /boot

Rest of drive – /

So, I fired up fdisk and created those three partitions.

Then, I ran mke2fs on /boot and / to create ext4 partitions:

mke2fs -t ext2 /dev/sda2
mke2fs -t ext4 /dev/sda3

Now, I can untar my tar files into the correct directory:

tar --preserve-permissions --preserve-order -z -x -f /mnt/lvolhome/matt/slash.tar.gz

Oops! This got me /mnt/real_slash/mnt/ssd_slash!

I just moved everything into the right directory (two dirs up) and  I was good to go.

I did the exact same thing with my /boot partition:

tar --preserve-permissions --preserve-order -z -x -f /mnt/lvolhome/matt/slash.tar.gz

So where does this leave me?  I have my Linux install on the correct disk, with all of the data ready to go.  The filesystems are the same (although / is bigger).

Before I can think about booting, I need to get GRUB reinstalled on that drive.

To do that, I cheated a little bit here and booted my bridge VM with an Arch Linux iso.  This is because I wanted to chroot, just like is done in the installer before reinstalling GRUB.

So, I downloaded the latest Arch iso and booted from it.  First, I activated the logical volumes:

vgchange -a y VolGroup00

I mounted my / partition to /mnt/arch

mount /dev/sda3 /mnt/arch

Then, I mounted my boot, var, and home partitions

mount /dev/sda2 /mnt/arch/boot
mount /dev/VolGroup00/lvolhome /mnt/arch/home
mount /dev/VolGroup00/lvolvar /mnt/arch/var

Next, I mounted all of the filesystems necessary for chrooting

cd /mnt/arch
mount -t proc proc proc/
mount -t sysfs sys sys/
mount -o bind /dev dev/
mount -t devpts pts dev/pts/

chroot /mnt/arch /bin/bash

From here, I only needed to do two things: Fix my fstab, and reinstall GRUB.For the fstab, the only thing I needed to do was change the UUID of my / and /boot partitions. I used blkid to find the new UUID.

blkid

And updated fstab appropriately:

fstab

With that fixed, I’m ready to get GRUB installed.

This actually required almost not work on my part, because the commands that generate the grub configuration file are fully automated.  I have an existing custom file in /etc/grub.d/40_windows for the windows boot option, but the Intel cloning software kept the UUID.

So, getting GRUB installed was as simple as the following:

grub-mkconfig -o /boot/grub/grub.cfg
grub-install /dev/sda

Using grub-install like that is why I wanted to chroot (and why I switched to an Arch iso).

After that was done, I reboot and both the Linux and Windows entries in the grub menu worked correctly (I changed my BIOS to boot to my HDD before my SSD).  Also, I have GRUB configured to chain boot windows.

Next, I’ll put /var back onto / (I only ever had it that way to save on SSD writes) and move my home directory to the HDD temporarily so I can reformat the RAID array as NTFS.

The Big Switch (Part 3)

I now have a C: drive with 60 gigs on it.  Ultimately, I want to clone that onto my SSD.  But, before I do that, I need to find out how much space is being used on the SSD.  Again, it’s an ext4, so Windows has no idea what to do with it.

So, I’m going to create a second raw disk to the SSD and make the accessible to the Ubuntu ‘bridge’ VM.  I won’t go through all of the steps again, since they’r exactly the same as before.  The only note is that (annoyingly), I can’t hot-add a disk in VirtualBox, so I needed to unmount everything, create the second raw mapping and boot up again.  Not a crisis, but annoying because I lost my samba install when I rebooted (live environment).

The SSD has two partitions that I care about: / and /boot.  I mounted / as /mnt/ssd_slash and /boot as /mnt/ssd_boot

I want to see how much data we’re talking about here, so I used du to determine how much room they were taking up:

ssd_size

A little less than 5 GB total.  My first thought was to copy these to the Windows partition before cloning it, but then I remembered that I’d lose my permissions when traversing filesystems.  So, the answer is to tar/gzip it first (although gzip is hardly necessary with the tiny amount of data).  I don’t have room in the ramdisk for quite that much, so I’ll copy it to my real home directory and then to my Windows machine.

As xkcd reminds us, this can be tricky to get right.

tar --preserve-permissions --preserve-order -z -c -f /mnt/home/matt/slash.tar.gz /mnt/ssd_slash
tar --preserve-permissions --preserve-order -z -c -f /mnt/home/matt/boot.tar.gz /mnt/ssd_boot

Note: unmount everything and shutdown the bridge VM before proceeding.

Now that I have tarballs of the SSD, I can safely ("safely"), clone my Windows install onto it.  Since I have an Intel SSD, I'll use their cloning tool available for download here.  It's just a branded version of Acronis TrueImage.  I downloaded the English version (the one without any specified language) and did a complete install.  At the time of this writing, it was version 1.1

Naturally, I chose the ‘Manual’ method when the options came up.

First, the program correctly detected my source disk:

source_disk


Then, it correctly guessed the destination disk (unsurprising as the destination is the only Intel SSD installed):

destination_disk


The program presented a warning, letting me know that the old drive had data on it.  I clicked ‘okay’.

warning


Obviously, I want to manually change my partition sizes.  Mostly, I just want to make sure that the new one will take up the whole disk.

There is one final ‘proceed’ prompt before I begin:

proceed


Finally, the program wants me to reboot.

reboot


I clicked ‘Reboot’ and and will continue in the next post.

The Big Switch (Part 2)

I was getting close, but still badly needed to free up some room on my Windows install.  My music folder was taking about about 50 gigs, so that seemed like a natural place to start.  Unfortunately, the place where I wanted the final version is an LVM2/ext4 volume.

Windows has no clue what to do with a LVM partition and the tools out there don’t know what to do with ext4.  So, the goal is to present the LVM2 volume group to a Linux machine that knows how to read it.  The solution?  VirtualBox with raw device mapping.

I’m going to boot up an ubuntu livecd and present the disk holding my container as a raw device.  Windows does see the disk – it just doesn’t know what to do with it.

First, I need to create the empty Virtual Machine.  This is because VirtualBox won’t let me create a VM when the folder already exists for it.  So, I create a VM with the following settings:

new_vm

I gave it 4096 MB of RAM and specified ‘Do not add a virtual hard drive’.  Click ‘Continue’ on the warning that comes up.

Next, I need to identify which disk it is in Windows.  To do that, use the disk management snap-in, which is diskmgmt.msc

dismgmt

From looking at the diagram, I can see that my drive array is Disk 2, since it’s the required size (and none of the other ones are even close to the right size).  For more confirmation and piece of mind, I could look at the properties and see that the manufacturer is HPT, which is short for Highpoint, the manufacturer of my RAID controller.

Now that I know I’m working with disk 2, I can create the vmdk.  I’m going to call the VM ‘Raw’, so I’ve created folder called ‘Raw’ in my “VirtualBox VMs” directory.  Now, run the command to map the vmdk:

C:\Program Files\Oracle\VirtualBox\VBoxManage.exe internalcommands createrawvmdk -filename “C:\Users\Matt\VirtualBox VMs\Raw\Raw.vmdk” -rawdisk “\\.\PhysicalDrive2”

The ‘2’ is the number I looked up in Disk Management.  Now, if I look in the ‘Raw’ directory, I see a .vmdk called ‘Raw.vmdk’.   Now I need to add that disk to the ‘Raw’ virtual machine, along with the livecd.   In the settings for the virtual machine, go to ‘storage’.

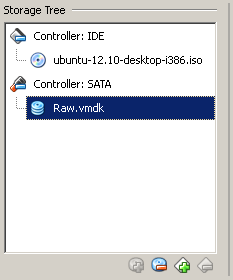
Connect the .iso to the IDE controller and the raw.vmdk file to the SATA controller.  The window should look like this when done:

raw

Click ‘okay’.  Before moving further, be very sure that you have the disk number right.  Accessing the wrong disk in raw mode can completely trash the disk.

In the ‘Network’ section, set the adapter to ‘Bridged’ mode.

bridged

If you’re 100 percent sure you have the drive number right, power on the VM.  Click ‘Try Ubunutu’ once the iso boots.  This will drop you to a desktop.  Next, click on the Ubuntu logo (I’m starting to regret my choice of LiveCD) and start typing ‘Terminal’ to open a terminal.

Become root:

sudo su –

Your LVM disk should be sda1 (it’s the only SATA device).  I’ll run pvs to see what the name of the VolumeGroup is:

pvs

I can see that it’s VolGroup00 (this is also a sign that I chose the correct disk).

Next, check what logical volumes exist in this VolumeGroup using lvs:

lvs

From the lvs output, I can see that I have 4 logical volumes, which is exactly what I expect to see.  The next step is to mount them.  I’ll create mount points under /mnt since I don’t need to mount lvolhome under the real /home, for example.  I don’t have any information on tmp or swap that I need, so I’ll skip those.

mountpoints

Now, actually mount the volumes using the normal mount command:

mount

If I cd into lvolhome, it’s my home directory.  We’re halfway done with this part.  Now that I have the logical volumes mounted, how can I access them from Windows?  The Ubuntu environment can use samba so we’ll do that.

Give root a password for samba (I wouldn’t do this in any other scenario ever!).

smbpasswd -a root

We also need to add a line to smb.conf to allow non-owners to share a directory.  With your favorite text editor, add the following to the [global] section:

usershare owner only = false

In Nautilus, go to the /mnt directory and right click on lvolhome.  Click on ‘Sharing Properties’ and install samba when prompted.  Restart your session when prompted.  Keep the default hame, but make sure to allow write access on the folder, as seen below:

sharing

If you receive a message about permissions when sharing, go back to your root shell and execute the following for each share.  Again, I’m playing fast and loose with permissions because I’m the only one on this system.  You would NEVER do this in a production environment, but you’d never do any of this in a live environment to begin with.

Next, find your machine’s IP address with ip addr:

ip_addr

If you browse to 192.168.11.14, you’ll see the two shares.  Enter the username root and the password assigned previously and the shares become writable.

The next step for me is to map a drive to lvolhome and copy my music library to this share so that I can delete it from my Windows machine.  I’m also going to copy a few VMs from virtualbox while in here (everything aside from the ‘Raw’ one that I’m using as my bridge).

With all of that copied and deleted, my C: drive is down to a much more manageable 60GB:

c_space

In the next part, I’ll start the actual migration.

The Big Switch (Part 1)

These days, I work primarily in the Microsoft world, which is a far cry from my beginnings as a CentOS/Cisco specialist.  For a long time, I’ve been using Linux as my primary desktop OS.  Whethre RedHat, Debian, Gentoo or Arch (the four distributions that I used on my primary PC for more than one year), I was running some form of Linux on my main PC, with a virtualized Windows installation when I needed to do something Microsoft.

As a result, when I last built a new machine, I laid out the storage like so:

120 GB SSD: Linux install and volume that held the bootloader.

4 TB RAID 10 (in the form of 4x 2TB drives): Main data partition

1TB HDD: Windows install.

The plan was to do most of my work in the Linux install and reboot into Windows on the occasions that I needed it.  However, because of the way I work from home, “when I needed it” turned out to be almost all the time.  As a result, I think I’ve been booted into Linux for one day over the past month, and that was just to make sure I updated it.

So, I think it’s time to switch these.  I want my Windows install to be on my SSD and my Linux install to be on my HDD.  Now, I could just copy one of them to a temporary location, just like in every textbook copy() function.  But, I’m going to have some fun with this and see if I can switch them without doing that.

I should also note that what makes this difficult is the way I have my data volume laid out.  It’s a huge LVM2 volume group, with ext4 on the actual logcial volumes.  Whoops.  While there is (apparently), some support for reading LVM2 inside Windows, nothing that I’ve found can read ext4 from Windows, and certainly nothing that can read them together.  Without further ado, let’s get started.

The Cleanup

The first challenge is that my SSD is 120GB.  But, my Windows install is, well, not.  It’s 225 GB and I’m going to have to cut that down.

sizeof_C

To do that, I’ll use TreeSize to figure out what’s taking up so much room and hopefully clear out enough junk so that my install will fit.  Here’s the result of running the program on my C: drive:

treesize_c_drive

Most of the space is in my profile, and I’ll clear that up myself.  This system doesn’t sleep, so I can turn off hibernation to get rid of hyberfile.sys and I can uninstall some programs, etc.  For example, MailStore is from when I was helping someone with an email migration that’s long since completed.

I deleted tons of junk, but was still left with 131GB used.  According to treesize, most of that was in the ‘Music’ directory.  The problem is that I have two copies of this.  Most of it is also on the Linux install, but some isn’t.  So, I’ll need to find a way to mount that LVM2/ext4 data inside Windows.

In the next part, I’ll get my LVM partition mounted in Windows and get some space cleared up on my C: drive.

Local Group Policy on Domain Controllers

Do Domain Controllers have a local group policy?

I’m actually not sure yet.  I could look this up on Google, but let’s find out, assuming no prior knowledge.

First, I want to find out where local GPOs live on computers that aren’t domain controllers.  To find it, I’ll fire up Process Monitor and then start gpedit.msc on a Windows 7 machine that isn’t joined to a domain.

I’ll confirm that mmc doesn’t call any child processes and configure filtering to only include mmc.exe:

1

So, mmc is the only process and doesn’t create any children while opening the group policy editor.  Let’s look at what it’s accessing:

Interestingly, I saw mmc accessing files all over my local profile.  I saw it accessing all of the actual policies, as shown in the screenshot below:

2

But, where was the actual GPO?  Scrolling through the trace, I saw the following:

3

This is looking promising.  I suspect that C:\Windows\System32\GroupPolicy holds the local group policies.  Let’s see what’s in that directory.  While typing the name into the ‘Run’ dialog, something else caught my attention:

4

Since Windows 2008R2 and Windows Vista, you can have multiple GPOs on a machine (XP only had one for the entire system).  Okay, so I am using some prior knowledge here.  This led me to believe I really was looking in the right place.  I browsed to that folder, saw subfolders for ‘User’ and ‘Machine’, and there it is!

5

Now, let’s see if these exist on a domain controller.  I logged on to a DC and browsed to C:\Windows\system32\GroupPolicy.  Sure enough, it was there.  Registry.pol shows up as a notepad document because I opened it to see what it contained.

6


Put aside the fact that we all know the answer for a moment and think about what would happen if we were trying to discover this for the first time.  Is this where domain GPOs are modified?  If not, how do we edit this, or can we?

The simplest test I can think of is to create a new GPO via the group policy manager mmc and see if it appears there, or changes the timestamp or has any other noticeable effect.  So, I created a new GPO called “Test-GPO”.  Absolutely nothing changed in that folder.

Domain group policies are stored in C:\Windows\SYSVOL\domain\policies and when I look in that folder, there are three policies there now:

7


The third one, conveniently enough, has a timestamp of the exact time that I created the new policy.  My next question is “can I edit the local GPOs on a domain controller?  If so, are they actually applied?”.

To find out, I tried to edit them the same way I do on a workstation or member server, with gpedit.msc:

8


This looks promising.  Local Group Policy Editor.  As a test,  I’m going to set the desktop wallpaper in both the local policy and the domain policy to see if it behaves the same way as on member servers, with the domain policy taking precedence.  My wallpaper is currently nothing.  So, I’ll download two example images that I throw together in paint, configure them and see which one is applied when I log back in.

Here’s the image that I’m going to apply to the local policy (or what I think is the local policy):

9


And here’s what I created for the domain policy:

10


I logged out and back in and here’s the result, which is exactly as expected.

11


Next, I want to set the domain policy back to “not configured” to see if the local policy is actually being applied at all.  I did that, logged out and back in, and here are the results:

12


That actually isn’t what I expected.  The first thing I did here was to make sure I specified the correct wallpaper in the configuration for the local policy and that there weren’t any typos.  That wasn’t it.  It turns out that I didn’t actually set it to ‘not configured’ when I thought I did.  I must have clicked ‘cancel’ in the dialog box.  Once I went back and fixed that, here’s the result:

13


So, it turns out that domain controllers do have local group policies and that the order of application still applies (domain overrides local).

Microsoft Update Catalog

For some reason, this is not a well known Microsoft site, but I’ve found it exceptionally useful for certain situations, such as installing new print servers.

Until there aren’t any 32 bit Windows computers anymore, we still need to install 32 bit drivers on print servers.  Of course, the trick can be finding the drivers in the first place.  This is one circumstance in which it’s often easier to deal with third party drivers.  In those cases, you download the 32 bit and 64 bit version of the same driver from the manufacturer, extract the actual driver files with 7-zip, install them and away you go.

But, things are more difficult with Windows drivers.  If it’s a printer that Windows has drivers for already, I’ve found that one of the most effective ways to locate that elusive x86 driver is from the Microsoft Update Catalog.  Note that this site only works correctly in IE, since it requires an ActiveX control to be installed.

When you get there, search for your printer by model name and find the driver that matches your architecture.  Then you can extract the actual driver with 7-zip and install it as the additional driver for shared printers.